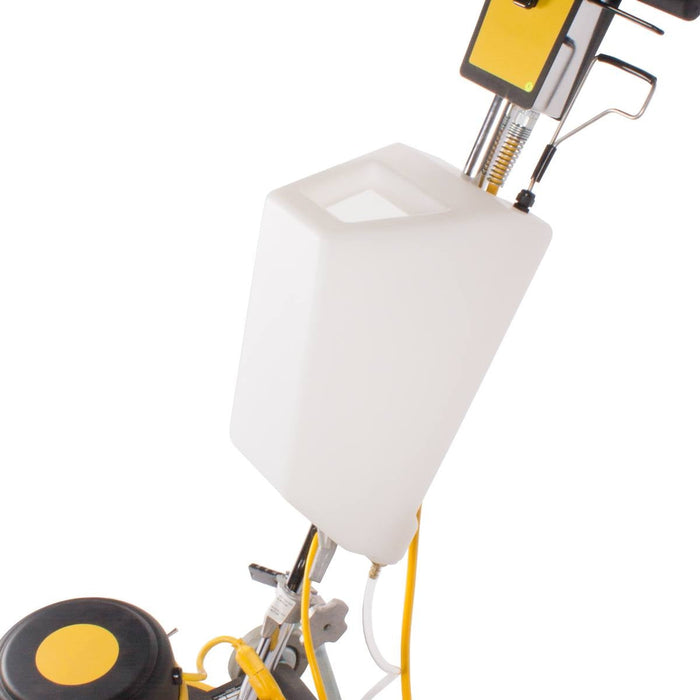
This 4 gallon solution tank is made specifically for carpet shampooing. When used in conjunction with a carpet bonnet, or a carpet scrubbing brush, you can easily dispense solution as you scrub. The solution tank can also be used to dispense solution on floors for scrubbing or stripping, but was manufactured with carpet scrubbing in mind. For other models and colors, please take a look at our complete selection of shampoo tanks.
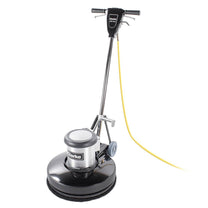
This solution tank will only fit onto any size and brand floor buffer. Please note that some floor buffers require a smaller 3/8" diameter hose. We offer a 1/2" to 3/8" O.D. conversion kit that will allow this tank to be attached correctly to these machines. We also have a full line of rotary floor scrubbing buffers available if you are in need of a new machine as well.
2. Remove the hose and fittings from inside the tank and set aside.
3. Remove the 2 u-bolts and mounting brackets from your handle.
4. Attach the 2 u-bolts and mounting brackets to your handle. For larger handles, the brackets on the u-bolts can be omitted. Leave bolts loose to allow for adjustment
5. If room is needed, loosen and lower the cordwrap bracket on your handle.
6. Attach top bracket to the solution tank.
7. Line up the bottom bracket and attach to the solution tank.
8. Adjust tank to proper height and tighten u-bolts
9. For thinner aprons, remove the angle and extention and put the washer and nut on the hose fitting. For thicker aprons, keep the angle and extention on the hose.
10. Remove the fitting protector and attach the main hose to the hose fitting.
11. Locate the hole in the apron that is made for the solution hold. Some machines have a cap in the hole. If there is a cap, remove it. Remove nut from fitting. If the fitting is too large for this hole, you will need a converstion kit and follow these instructions.
12. Slide extension rod through the hole in the apron, making sure the washer is on top. Attach the nut to bottom of rod. Make sure to adjust rod, so it will not rub pad driver, or brush!
2. Remove the hose and fittings from inside the tank and set aside.
3. Remove the 2 u-bolts and mounting brackets from your handle.
4. Attach the 2 u-bolts and mounting brackets to your handle. For larger handles, the brackets on the u-bolts can be omitted. Leave bolts loose to allow for adjustment
5. Attach top bracket to the solution tank.
6. Line up the bottom bracket and attach to the solution tank.
7. Adjust tank to proper height and tighten u-bolts.
8. Remove the the "L" fitting from the supplied hose.
9. Remove the fitting protector.
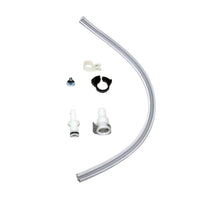
10. Check your Conversion Kit for the 3/8" hose and the two quick connect ends.
11. Put the larger quick connect fitting on the 1/2" hose.
12. Put the smaller quick connect fitting on the 3/8" hose.
13. Take the two hoses with the quick connects on them, and join the two quick connects.
14. Attach 1/2" hose to the solution tank.
15. Put the 3/8" hose into the hole in the apron near the motor. If you have too much hose, you can cut the hose to length. The hose should be snug in the hole and may need to be twisted back and forth to get the hose to stay on the apron.
16. Check the bottom of the apron to make sure you can see the hose. The hose should come flush with the apron. Hose should not extend beyond the apron, so it will not rub pad driver, or brush!
This product is great. It has no flaws other than one small one. It's hard to empty if you have a little left. But other then that it's great! I recommend!
p
palm city cleaner
Life made easy
Holds cleaning chemical perfect and dispenses as it should .....Makes life so much easier using my Viper polishing machine
Get peace of mind with virtual technical assistance & save on future purchases. Renews annually. Learn more
+ SuperFreak
SuperFreak Customer Loyalty Membership
Membership in the SuperFreak program includes 12 months of top tier service and support to you at a moment's notice. No more waiting for a service tech to fit you into their busy schedule & come visit your facility. Get virtual training, troubleshooting & sourcing to repair your machinery as quickly as possible.
What the Program Includes
Free video and/or phone assistance for machine setup and training.
Access to factory trained and certified virtual service technicians.
When it comes to warranty claims, you aren’t alone.
No more guessing when it comes to repair parts.
You’ll have your own product expert ready to help.
10% off parts and consumable purchases for the life of your plan.